
Here is the Complete and Step by step guide for goods and services tax registration or the New GST Number Application. Thus, after going through this article you will be able to apply for GST registration online. Similarly, you will be able to get GST registration online in India. This is a Free GST application process exclusively available on the GST India website.
This GST Registration procedure applies to Normal Taxpayers, Composition Dealers, Casual Taxable persons, Input Service Distributors (ISD), and SEZ developers/ SEZ Units.
GST Registration Online Process
Time needed: 1 hour and 5 minutes
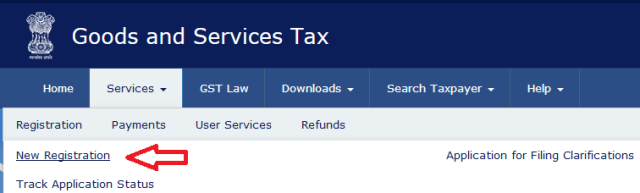
- First of all Visit https://www.gst.gov.in URL
- Click the Services > Registration > New Registration option
The GST Registration Application form consists of two parts Part A and Part B.
GST Registration – Part A:
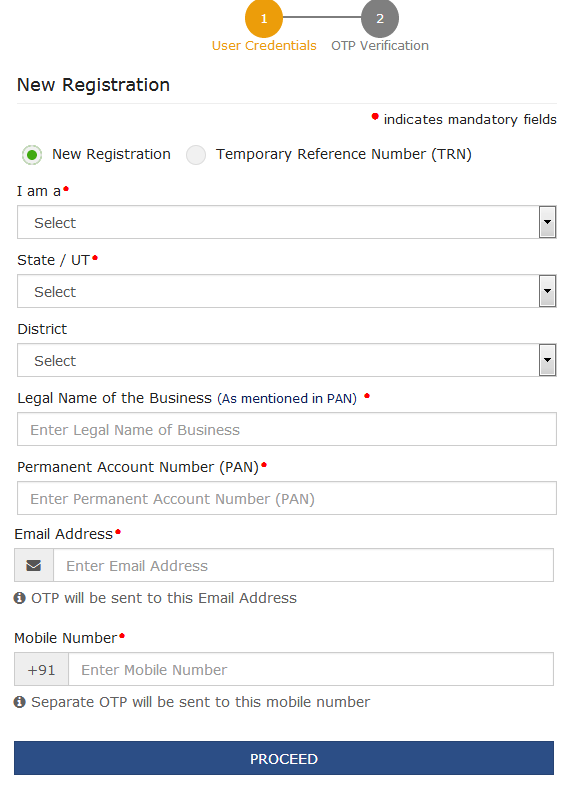
3. The New GST Registration page will display and here you have to select the New Registration option.
4. In the I am a drop-down list, select the Taxpayer as the type of taxpayer to register.
5. In the State/UT and District drop-down list, select the state for which GST registration requires.
6. In the Legal Name of the Business (As mentioned in the PAN) field, enter the legal name of your business/ entity as mentioned in the PAN database.
7. In the Permanent Account Number (PAN) field, enter the PAN of your business or the PAN of the Proprietor.
8. In the Email Address field, enter the email address of the Primary Authorized Signatory.
9. In the Mobile Number field, enter the valid Indian mobile number of the Primary Authorized Signatory.
11. Finally, click the PROCEED button.
The OTP Verification page is displayed.
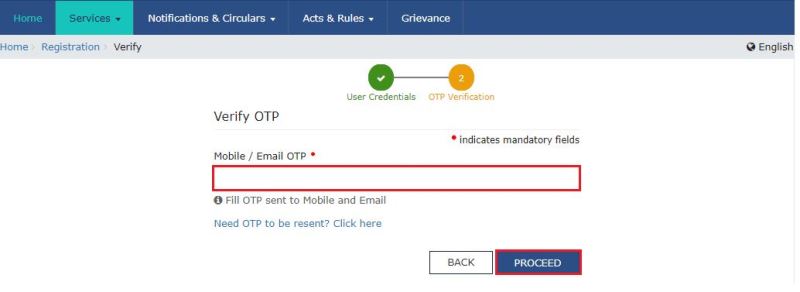
12. In the Mobile OTP field, enter the OTP you received on your mobile number, and probably OTP is valid only for 10 minutes.
13. In the Email OTP field, enter the OTP you received on your email address and probably OTP is valid only for 10 minutes.
13. Click the PROCEED button and the system-generated Temporary Reference Number (TRN) will be displayed immediately.
14. Finally, click the PROCEED button.
Part B:
15. In the Temporary Reference Number (TRN) field, enter the TRN generated and enter the captcha text as shown on the screen.
16. Click the PROCEED button. The Verify OTP page is displayed. You will receive the same Mobile OTP and Email OTP. These OTPs are different from the OTPs you received in the previous step.
17. In the Mobile / Email OTP field, enter the OTP you received on your mobile number and also on the email address. OTP is valid only for 10 minutes.
18. Click the PROCEED button.
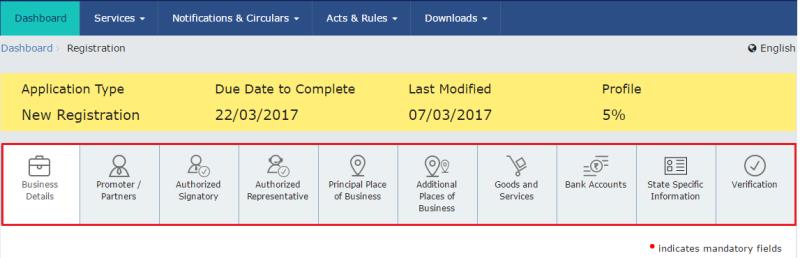
19. The My Saved Application page is displayed. Under the Action column, click the Edit icon (icon in blue square with white pen).
The GST Registration Application form with various tabs is displayed. Click each tab to enter the details as explained below:
Business Details tab:
First of all the Business Details tab is selected by default. This tab displays the information to be filled for the business details required for GST registration.
a) In the Trade Name field, enter the trade name of your business. Note: The trade name of the business is different from the legal name of the business.
b) In the Constitution of Business drop-down list, select the type of constitution of your business and then this will be validated with the CBDT Database for a match with the PAN entered in Part A of the form.
c) In the District and Sector/ Circle / Ward / Charge/ Unit drop-down list, select the district and sector/circle/ward/charge/unit number of your business.
d) In the Commissionerate Code, Division Code, and Range Code drop-down list, select the appropriate choice. Note: In case you don’t know the Center Jurisdiction, click the link to know about your Center Jurisdiction.
e) In the Option for Composition field, select Yes in case you want to opt for the Composition Levy, or else select No. In the case of Yes, Select the checkbox for accepting the declaration for opting for Composition Levy.
f) Select the Date of commencement of Business using the calendar.
Date of Registration
g) Select the Date on which liability to register arises using the calendar.
- A casual taxable person shall electronically submit an application at least five days prior to the commencement of business.
- In the case of a Casual Taxpayer, the date on which liability to register arises is auto-filled.
- In case of Reason to obtain Registration selected as Voluntary Basis, this field is disabled and visible.
h) In Are you applying for registration as a casual taxable person? field:
Select Yes in case you are a casual dealer, or else select No. In case of Yes > a. In the Estimated supplies and Estimated Net Tax Liability field, enter the estimated turnover and Net Tax Liability. b. The casual taxpayer may opt to pay the estimated tax liability by clicking the CREATE CHALLAN button.
i) In the Reason to obtain registration drop-down list, select the reason for liability to obtain registration for your business.
j) In the Indicate Existing Registrations section:
First of all Select the existing registration type, Registration No. and Date of GST Registration. Also, click the Add button.
k) Finally, click the SAVE & CONTINUE button and you will notice a blue tick on the Business Details section indicating the completion of the tab information and notice the Profile indicating the percentage completion of the application form.
Promoter/ Partners tab:
This tab page displays the details of the stakeholders chosen in the constitution of the business detail. Furthermore, You can enter details of up to 10 Promoters or Partners.
a) In the Personal Information section, enter the personal details of the stakeholder like name, date of birth, address, mobile number, email address, and probably gender.
b) In the Identity Information section:
Enter the official information of the stakeholder.
i. First of all, In the Designation and Status field, enter the designation of the stakeholder.
ii. Also in the Director Identification Number (DIN) field, enter the DIN of the stakeholder issued by the Ministry of Corporate Affairs. Maybe This number is not mandatory in the case of proprietorship.
iii. In case you are a citizen of India, select Yes or else select No and in case of NO, In the Passport Number field, enter the passport number.
iv. In the Permanent Account Number (PAN) field, enter the PAN of the stakeholder.
v. Finally, in the Aadhaar Number field, enter the Aadhar number of the stakeholder.
c) In the Residential Address in India section:
Enter the address details of the stakeholder and based on the State selected, select the district and enter the corresponding pin code.
d) In the Document Upload section, first of all, click the Choose file button and Navigate and upload the photograph of the stakeholder. Note: You may be uploading PDF or JPEG files with a maximum file size for upload of 1 MB.
e) In case the promoter or partner is also the authorized signatory, select Also Authorized Signatory as Yes, and details will be auto-populated in the Authorized Signatory tab.
f) Click the SAVE & CONTINUE button. Note: To add more details of the promoter or partner, click the ADD NEW button and repeat the steps each time after adding the details of the stakeholder
Authorized Signatory tab:
This tab page displays the details of the authorized signatory. You can enter details of up to 10 authorized signatories.
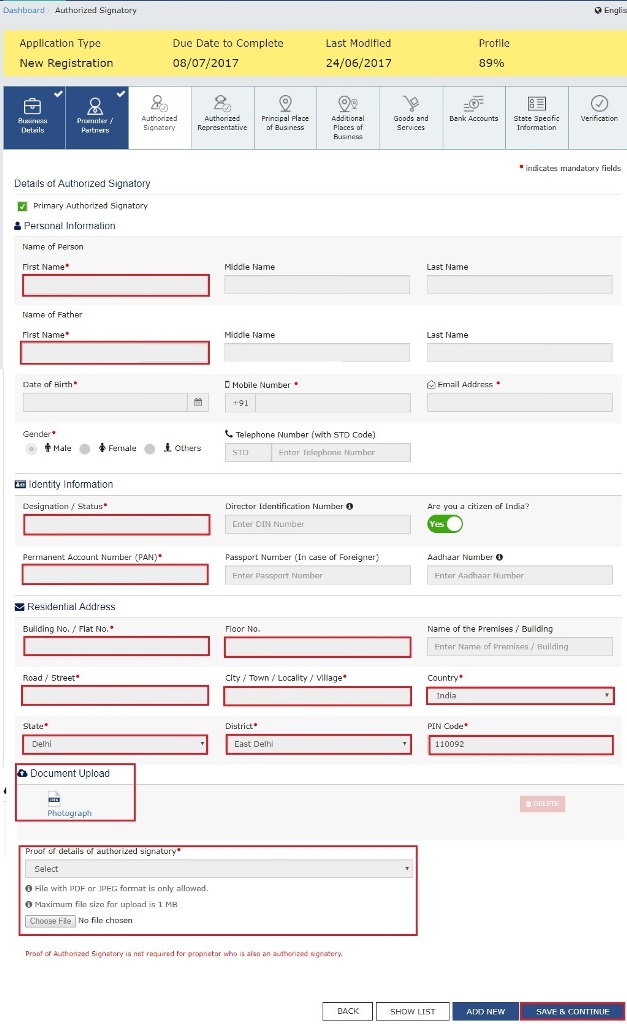
a) In case you are the Primary Authorized Signatory, select the checkbox for Primary Authorized Signatory.
b) In the Personal Information section, enter the personal details of the authorized signatory like name, date of birth, mobile number, email address, and gender.
c) In the Identity Information section, enter the official information of the stakeholder.
i. In the Designation / Status field, enter the designation of the authorized signatory.
ii. In the Director Identification Number (DIN) field, enter the DIN of the authorized signatory issued by the Ministry of Corporate Affairs. This number is not mandatory in the case of a proprietorship.
iii. In case you are a citizen of India, select Yes or else select No.
a. In the case of NO.
b. In the Passport Number field, enter the passport number.
iv. In the Permanent Account Number (PAN) field, enter the PAN of the authorized signatory.
v. In the Aadhaar Number field, enter the Aadhar number of the authorized signatory.
d) In the Residential Address in India section:
Enter the address details of the authorized signatory. Based on the State selected, select the district and enter the corresponding pin code
e) In the Document Upload section, click the Choose file button. Navigate and select the Proof of Appointment and photograph of the authorized signatory.
f) Click the SAVE & CONTINUE button. Note: To add more details of the authorized signatory, click the ADD NEW button.
Authorized Representative tab:
This tab page displays the details of the authorized representative.
a) Select Do you have any Authorized Representative using the radio button?
In the case of GST Practitioner
a. In the Enrollment ID field, enter the enrollment ID of the authorized representative.
b. Click the SEARCH button.
Note: All details of the authorized representative will be auto-populated from the GST Portal.
In the case of Other
a. In the Name of Person section, enter the name, designation, mobile number, and email address of the authorized representative.
b) Click the SAVE & CONTINUE button.
Principal Place of Business tab:
This tab page displays the details of the principal place of the business. The principal Place of Business is the primary location within the State where a taxpayer’s business is performed. The principal place of business is generally the address where the business’s books of accounts and records are kept and are often where the head of the firm or at least top management is located.
a) In the Address section:
Enter the address details of the principal place of business. Based on the State selected, select the district and enter the corresponding pin code.
b) In the Contact Information section:
Enter the official contact details like Email address, telephone number (with STD Code), mobile number field, and fax number (with STD Code).
c) In the Nature of Possession of Premises drop-down list:
Select the nature of possession of premises.
d) In the Document Upload section:
First of all, click the Choose file button. Navigate and select the Proof of Principal Place of Business document.
Own premises – Especially any document in support of the ownership of the premises like the Latest Property Tax Receipt or Municipal Khata copy or copy of the Electricity Bill.
Rented or Leased premises – You can upload a copy of the valid Rent / Lease Agreement with any document in support of the ownership of the premises. It may be the Latest Property Tax Receipt or Municipal Khata copy or copy of the Electricity Bill.
Premises not covered above – A copy of the Consent Letter with any document in support of the ownership of the premises of the Consenter like a Municipal Khata copy or Electricity Bill copy may be uploaded as another proof of place of business. Also for shared properties, the same documents may be uploaded. Read the Documents Required For GST Registration Of Individuals/proprietors here.
e) Select the checkbox for the Nature of Business activities being carried out at the above-mentioned premises.
f) In case you have an additional place of business, select Yes to Have Additional Place of Business.
g) Click the SAVE & CONTINUE button.
Additional Places of Business tab:
This tab page displays the details of the additional place of the business.
Enter the number of additional places of business and click the ADD NEW button. Enter the details similarly to the Principal Place of Business Details provided above.
Goods and Services tab:
This tab page displays the details of the goods and services supplied by the business. In case you deal with Goods or Commodities, you need to mention the HSN Code in the Goods tab. In case you deal with services, you need to mention the SAC Code in the Services tab. You can add a maximum of 5 goods and 5 services. In case, you have more than 5 goods or services, you must add the top 5 goods or services you are dealing with.
Goods Tab: In some cases, you may know the HSN Code, and in some cases, you might not know the HSN Code. Follow the steps given below to fill out the HSN Code.
In case you know the HSN Code: Let us take an example you need to add the HSN Code 6105. To add the HSN Code, perform the following steps: a. In the Search HSN Chapter by Name or Code field, enter the first four-digit 6105 from the HSN Code. HSN Code is successfully added.
In case you do not know the HSN Code: Let us take an example of where the dealer deals with cotton textiles. a. In the Search HSN Chapter by Name or Code field, type cotton; the related HSN Chapter list is displayed. From the displayed list, scroll and select the appropriate option (in this case 5208). HSN Code is successfully added.
Services Tab:
a) In the Search by Name or Code field, type the name or the SAC Code of the services supplied by the business. SAC is successfully added.
b) Click the SAVE & CONTINUE button.
Bank Accounts tab:
Furthermore, this tab page displays the details of the bank accounts maintained for conducting business. You may be entering details of up to 10 Bank Accounts. Enter the number of bank accounts and click the ADD NEW button.
a) In the Account Number field, enter the account number of the Bank.
b) In the Type of Account drop-down list, select the type of account.
c) In the Enter Bank IFSC field, enter the IFSC code of the Bank.
d) In the Document Upload section, click the Choose file button. Navigate and select the scanned copy of the Bank passbook/ statement. Note: You can upload PDF or JPEG files with a maximum file size for upload of 1 MB.
e) Click the SAVE & CONTINUE button. Note: In case you want to add details of more Bank accounts, click the ADD NEW button.
State Specific Information tab:
Most of all this tab page displays the details of the state.
a) In the Professional Tax Employee Code (EC) No. field, enter the professional tax E.C number, and In the Professional Tax Registration Certificate (RC) No. field, enter professions tax R.C number.
b) In the State Excise License No. field, enter the state excise license number, and in the Name of the person in whose name the Excise License has held the field, enter the name of the person in whose name the excise license is held.
c) Finally, click the SAVE & CONTINUE button.
Verification tab:
Another tab is called the verification tab and his tab page displays the details of the verification for authentication of the details submitted in the form.

a. Select the Verification checkbox and In the Name of Authorized Signatory drop-down list, select the name of the authorized signatory.
b. In the Place field, enter the place where the form is filed After filling out the enrollment application, you need to digitally sign the application using Digital Signature Certificate (DSC)/ E-Signature or EVC. Because digitally signing using DSC is mandatory in the case of LLPs and Companies.
The Enrollment Application can be electronically signed using E-Signature only if the authorized signatory has an Aadhar number and the same is mentioned in the Authorized signatory tab page of the Enrollment Application. This is because E-Signature is an Aadhar card-based electronic verification service.
In the Case of DSC:
e. Click the SUBMIT WITH DSC button.
To check if the emSigner is running on your laptop/ desktop, perform the following steps:
1. Click the item tray and Double click the emSigner icon.
2. Click the Hide Service button to minimize the dialog box, select the certificate and click the SIGN button.
3. Enter the PIN (dongle password) for the attached DSC. Note: To view the details of your DSC, click the View Certificate button and Click the PROCEED button.
4. Furthermore, select the certificate and click the SIGN button.
You can track the status of your GST Registration application using the Services > Registration > Track Application Status command.
In the Case of EVC:
e. Click the SUBMIT WITH EVC button.
f. Furthermore, Enter the OTP sent to the email and mobile number of the Authorized Signatory registered at the GST Portal and click the VALIDATE OTP button.

After completing the above steps, a success message will get flash on the screen and you will receive acknowledgment in the next 15 minutes on your e-mail address and also on your mobile phone number. Finally, the application Reference Number (ARN) receipt will be sent to your e-mail address and mobile phone number.
About GST Registration
The above GST registration is very easy and simple. Therefore, you can follow these steps and quickly apply for the new registration. However, the taxable person shall note that for different states, you need a separate GST registration. Also, one must keep in mind the below things.
- GST registration is completely free and there are no charges if a person is doing it on their own
- The GST registration can be canceled by following the procedure
- Multiple registrations can be taken on one PAN
- If registration is canceled, you cannot pay your tax and file the returns.
- GST registration is mandatory for small businesses if they cross the turnover limit set for registration.
- You can not transfer the GST registration. However, you can change the place of business or apply for a new one after the cancellation.
- If your registration is rejected, know what is the reason for rejection.
Quick GST Registration Answers
No. Read who requires GST registration from here.
Yes. You need not have to pay any fee for GST registration in India. However, if you are hiring any professional to do this job, he may charge his fees.
The GST Registration number is a 15-digit, PAN-based unique ID.
The GST Registration takes 3 working days.
Yes, if the place of business is in a different state.
Yes, you can cancel it online by going to the GST portal.
You can take multiple registrations on one PAN.
Similar Links on GST Registration
Documents Required For GST Registration
Know which documents you require for taking GST registration in India. Thus, here is the complete list of GST documentation.
GST Certificate Download with login
Now you can download the GST certification online from the GST portal within no time. Also, the process is very simple to download and print the Certificate.
Cancellation of GST Registration in India
Follow the GST cancellation process as per the CGST rules. Also, you must know what are things to be completed before you cancel your certificate.
How to check GST status?
Already submitted an online GST application? Read to know the steps to check your registration status.